MEETING
NOTICE |
Nov 6 at 7:00pm |
|
|
|
|
| Chris Reeder (509) 883-8272 cjreeder@yahoo.com |
|
Normally when you set up your throttle linkage, you only get control over
the idle and wide open points. This may leave you with an engine that
seems to be "all or nothing" instead of a nice linear transition between
say 5% thrust (idle) and 100% thrust (wide open). Note that thrust goes up
as the square of rpm, so 50% thrust is achieved at about 70% of full
throttle rpm. The goal of this article is to present ways of matching up a
third point at mid throttle so your plane has a more linear throttle
transition. Here's how to do it: Method 1: Electronically For those so blessed with cool radios, just set up throttle exponential (most likely positive expo is needed) or use a multi-point throttle-to-throttle programmable mix to fully customize your throttle curve. For those without such cool radios, I recommend using one of the mechanical methods below: (Note: this article assumes that your throttle opens as the throttle pushrod moves toward the engine) Method 2: the Exponential linkage. This gives the smoothest results out of the mechanical methods. a. When at the flying field with the high speed and low speed needles properly set and with the engine warm, use a tachometer to measure the full throttle rpm. b. Back off the throttle until the rpm drops to exactly 70% of the full throttle rpm. (You did bring your calculator to the field, right?) Set the transmitter aside (DON'T bump the throttle stick), and disconnect the fuel line to kill the engine. c. Carefully measure how wide the carburetor throttle body is open. Calipers may be used, or just find something like a tapered stick of wood and mark on it how far it sticks into the throttle body. Now you're ready to work on the plane. d. Start by setting both ends of the throttle end point adjustment (EPA) to the same value, probably somewhere between 90% and 110%. e. Then set the transmitter throttle stick to half throttle. Now take the servo horn off the throttle servo and rotate it toward the engine so that it's about 20-30 degrees from being perpendicular to the pushrod. Reinstall at that angle. f. Shorten the throttle linkage accordingly so that with transmitter stick at half throttle, the carburetor is open exactly the same amount you measured earlier. g. Check wide open and idle throttle settings. If the servo has too much travel in both directions and overshoots both the wide open and idle positions, decrease throttle EPA on both ends BY THE SAME AMOUNT to improve the situation. Or increase EPA on both ends if the servo has not enough travel in both directions. h. If the servo undershoots the idle position but OVERshoots wide open position, repeat steps D - G by removing the servo arm again and rotating it one more notch toward the engine. Or one more notch away from the engine if the opposite is true. i. Repeat steps D thru H until the servo hits as close to wide open and idle as possible while still having identical upper and lower EPA settings. Only then do you fudge the top or bottom EPA just a little bit as needed to make sure the servos don't buzz, etc. j. Fly it and see how you like it! Method 3: EPA Only |
|
|
|
|
 |
Don Hart 980 S Main Colfax, WA 99111 (509) 397-2808 dhart@colfax.com |
|
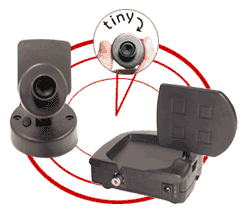
Every R/C model plane enthusiast has the dream of being able to see the
view from the cockpit of his latest flying machine. And maybe, to even
pilot the plane using that perspective. Advances in miniaturization of
electronics and video cameras makes implementing this dream feasible. Still Pictures My earliest experience with taking pictures from a R/C plane involved using a simple point-and-shoot 35mm camera mounted on the side of one of my planes, a sort-a-scale Hollandaire "Libel". This plane is a high wing plane that has about a 78 inch wingspan and is powered by an old Veco 61 two stroke. It flies well and seemed to be an ideal candidate for an aerial photography platform. I made up a camera mount using plywood and aluminum strip. I mounted the camera with rubber bands with a piece of foam between the ply mounting plate and the camera to minimize vibration. A servo strapped to the top of the camera provided control over the shutter. The camera mount was screwed to the side of the plane under the left wing, away from the engine exhaust. I took this contraption to Sawyer's field for a test flight. The camera and plane seemed to function fine together. There was no radio interference from the autowind on the camera, so it was time to give it a try. The takeoff was uneventful, but the externally mounted camera seemed to cause some turbulence over the tail surfaces, making it a little difficult to fly. It wasn't unmanageable so I continued the flight. I took several pictures from various altitudes, distances and directions. I landed after taking most of a roll of film. Of course, I couln't see the results until I got the film developed. A few days later I was able to see the fruits of my labor. I got several good shots and several not-so-good shots. Some were not well framed, some had a lot of motion blurring and some looked good, considering that all I could use for reference was the direction the left wing was pointing. I scanned several of the better pictures into my computer. There's one on the club web site that shows the Sawyer house and the runway from a fairly high altitude. My next attempt at still photos will be with an internally mounted camera - maybe a digital camera. An electric powered plane might be a better option - turn power off for picture taking, turn it on to gain altitude and position the plane for the next shot. Airborne Video I considered putting my video camera in one of my planes, but the four pound weight made that option unfeasible except for a VERY large plane. I decided to consult the internet. There are several web sites devoted to aerial still photography and video. Some of these are by modelers who have businesses involved in taking photos for real estate agents and other business customers. Some use fixed wing model aircraft and some use model helicopters. Some of the fixed wing planes are modified from hobby kits, others are designed specifically for the task. There are model helicopters large enough to carry full size professional video cameras. Some of these aircraft are used for fun and some for military surveillence. Others are used in movie production. Most have some sort of wireless video capability. Video can be wireless or not. The advantage of wireless video is that you can see what the camera is seeing while you are flying. The disadvantage of wireless video is low resolution and high cost. For commercial applications, a combination of both might be the best approach, using the wireless video camera for aiming a non-wireless camera. A search of the internet for wireless video equipment resulted in some interesting information. There are two general classes of wireless video equipment: expensive and cheap. The expensive equipment has much greater capabilities, but I'm not willing to risk a bunch of money to try wireless video in one of my planes. Most of the high end equipment require an amateur radio license to legally operate it. I have the amateur radio license, but the equipment is still too expensive. Now, at the low, low end is equipment intended for in-home wireless video. This is equipment that uses the X10 home automation protocol. I recently ran across an article in RCezine http://www.rcezine.com/Aug2001/electrics.html that explained how to modify one of these X10 video systems for R/C model use. The article also provided a URL (www.x10.com) to a X10 video vendor. This looked so good that I ordered a wireless video system on the spot. The wireless video package included TWO Xcam2 wireless video camera/transmitter units, a video receiver and a X10 remote controller. All for $120. This is in my price range and the two camera units mean I get at least two chances to try wireless video in a R/C aircraft. It requires no license to operate. This particular package is no longer available, but similar systems are. Of course, the low price comes with some performance restrictions. The range of the unmodified Xcam2 unit is about 100 feet. This was not a problem for the author of the RCezine article because his video system was mounted on an electric park flyer. The author made some modifications to the airborne video components to meet his needs. First, he removed the camera and transmitter from their plastic cases. The transmitter has a small directional antenna, a flat, thin rectangular device about one inch square. He replaced this directional "patch" antenna with a simple, easy to build, home made omnidirectional antenna. The new antenna also increases the range. I had planned to install this video system in my 1/4 scale J-3 Cub, but the mid-air collision earlier this year makes that option unavailable until I can rebuild the Cub. However, I have a Midwest Citabria that should work just fine. Now I need to get busy modifying and installing the video system. I hope to have something to show soon. References: http://www.planetalk.com uav, rpv, r/c video http://www.nctc.com/~dfluehe/airbornvideo.htm cheap "spy" video http://members.aol.com/olson222r/xcam2.html Xcam2 r/c airborne video http://www.geocities.com/CapeCanaveral/7376/index.html r/c aerial photography http://www.geocities.com/CapeCanaveral/7376/links.html video link page http://www.rsr.org/above_rocky_pan.html 360 degree panorama
|